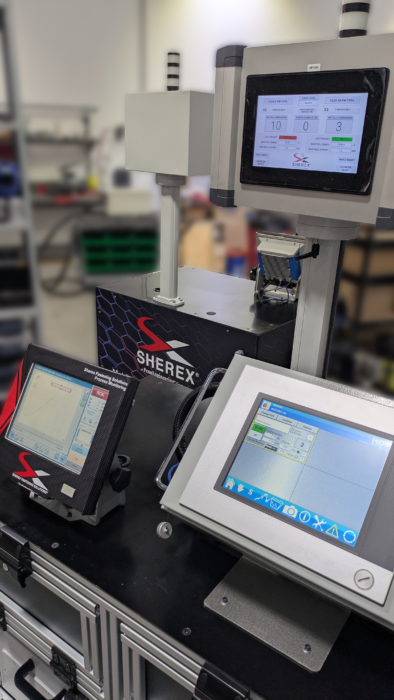
Posted by Pier Cipollone on | Comments Off on Sherex’s Mobile Process Monitoring System
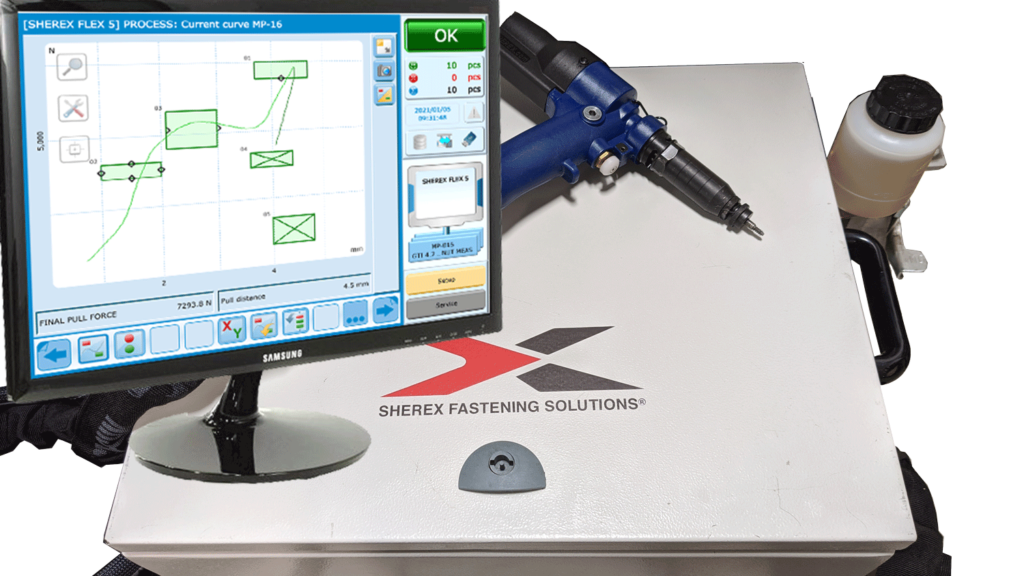
In the fast-paced world of automotive manufacturing, efficiency, precision, and adaptability are critical to staying ahead. For a one automotive tier, Sherex Fastening Solutions delivered a custom tooling solution to combine flexibility and precision: a Mobile Process Monitoring System, integrating the MDS A210 and FLEX-5 Process Monitoring System. This innovative system can help assemblers transform how rivet nut installations are managed, offering a wide-range of options on the assembly floor. Adding to this, the two state-of-the-art process monitoring systems offer mobility, quality assurance, and data-driven insights—all from a single, versatile platform.
A New Standard in Flexibility
Traditional rivet nut installation systems are often stationary, tethered to a single assembly cell. This can limit efficiency in dynamic production environments where flexibility is key. Sherex’s Mobile Process Monitoring System breaks this mold by mounting the powerful MDS A210 and FLEX-5 Process Monitoring System onto a mobile platform, allowing assemblers to move the tools seamlessly across the facility. Whether it’s navigating between workstations or adapting to shifting production demands, this solution ensures that high-quality installations can happen anywhere, anytime.
The cart’s mobility allows assemblers in a variety of industries optimize their workflow without sacrificing precision. By bringing the tools directly to the point of installation, downtime is minimized, and productivity increases. This is particularly valuable in high-volume settings where every second counts, and the ability to reposition equipment quickly can make a significant difference in meeting tight production schedules.
Precision and Quality with Process Monitoring
At the heart of the Mobile Process Monitoring System is Sherex’s advanced Process Monitoring System, designed to ensure perfect rivet nut installations. The FLEX-5, paired with the MDS A210, delivers real-time quality assurance by evaluating each installation for both the rivet nut and the base material. The system provides immediate OK/NOK (Not OK) feedback, alerting operators to any issues during the installation process. If an installation is flagged as NOK, the system’s “stop tool” function halts operations, allowing for review and correction before proceeding, reducing errors and waste.
The integration of these tools with a central controller takes quality control to the next level. The system collects critical data, including force and distance metrics, as well as the number of blind rivet nuts installed and overall parts produced. This data is stored and can be exported to a USB or server for detailed reporting, enabling manufacturers to track performance, identify trends, and maintain compliance with stringent industry standards, such as those required in automotive assembly.
Data-Driven Efficiency
The Mobile Process Monitoring System reporting capabilities provide historical installation data, offering a clear view of production efficiency and quality over time. With customizable settings and easy-to-read screens, operators can quickly interpret data and make informed decisions. This level of transparency is invaluable for automotive tier assemblers, where maintaining high standards while minimizing costs is a constant balancing act.
By ensuring perfect installations, the cart helps reduce material waste and rework, driving down costs while boosting overall efficiency. The 2-3 second cycle time of the FLEX-5 and about 5-6 seconds for the MDS A210 ensures that high-volume production lines keep moving without compromising quality. For industries like automotive, where process monitoring is increasingly a requirement, this solution aligns perfectly with evolving quality standards.
Why It Matters
Sherex’s Mobile Process Monitoring Cart is more than just a rivet nut installation tool—it’s a strategic advantage. By combining the mobility of a cart-based system with the precision of the MDS A210 and FLEX-5, Sherex has created a solution that adapts to the current needs of assemblers in not only automotive, but all industries. Whether it’s installing rivet nuts in aluminum, composites, or other materials, this system delivers consistent, reliable results across diverse applications.
Ready to elevate your assembly process? Learn more about Sherex’s Process Monitoring Systems and discover how our Mobile Process Monitoring Cart can drive efficiency, quality, and flexibility in your facility. Contact our team today to explore how this innovative solution can be tailored to your production needs.
Posted by Pier Cipollone on | Comments Off on Why Force Matters
By John Knechtges Engineering Manager, Sherex Fastening Solutions
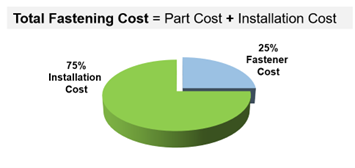
Blind rivet nuts are threaded fasteners that provide strong attachment points in thin materials. They can be utilized in many sheet types, including ferrous and non-ferrous metals, plastics, and composites. Advantages over competing alternatives, such as weld nuts, are: blind rivet nuts only require one side of the sheet to be installed, can be installed after finishes have been applied to the base sheet (no thread masking), and can be installed with comparatively inexpensive tooling. Considering speed, consumables, and methods of installation, rivet nuts support the “Lowest Total Installed Cost” model.
To install rivet nuts, a tensile force must be generated on the body, thereby compressing the unthreaded portion, mechanically riveting the item to the sheet. This tensile force will vary by body size, material type of the rivet nut, and even material thickness of the base sheet. If the installation force is not adequate or appropriate, harmful failures can result.
Uninstalled and installed rivet nut
An underset rivet nut can result in the rivet nut spinning during assembly or setting further during assembly, producing lack of adequate preload. An overset rivet nut can result in thread damage or the separation of the threaded section from the unthreaded, or riveted, section — effectively, a “pull-out” condition. All these occurrences could be devastating to the assembled joint and can lead to costly in-line reworks. Or worst-case, can later lead to even more costly recalls.
The best way to eliminate costs downstream is to mitigate failure modes upstream. In the case of rivet nut installation, failure modes include: too much force, resulting in oversets (part damage); undersets, resulting in spin-out or inadequate preload; or “offset” installations, where the head of the rivet nut is not in contact with the substrate. This condition can lead to both spin-out and pull out, which is the most harmful scenario. The question remains: how can we prevent these conditions? The answer is rooted in the setup of the installation tool, and what parameters can be monitored.
“Offset” installation
In a production environment, there are two forms of recommended fastener installation tools: pull-to-stroke and pull-to-pressure. Pull-to-stroke is a form of installation whereas the tool is set to pull to a certain distance, typically with a hydro-pneumatic action. The tool will pull the rivet nut down that set distance each time, irrespective of any other setting. This type of tooling is sensitive to thickness variations in the base material. Even slight changes in thickness can result in an over or under-set condition.
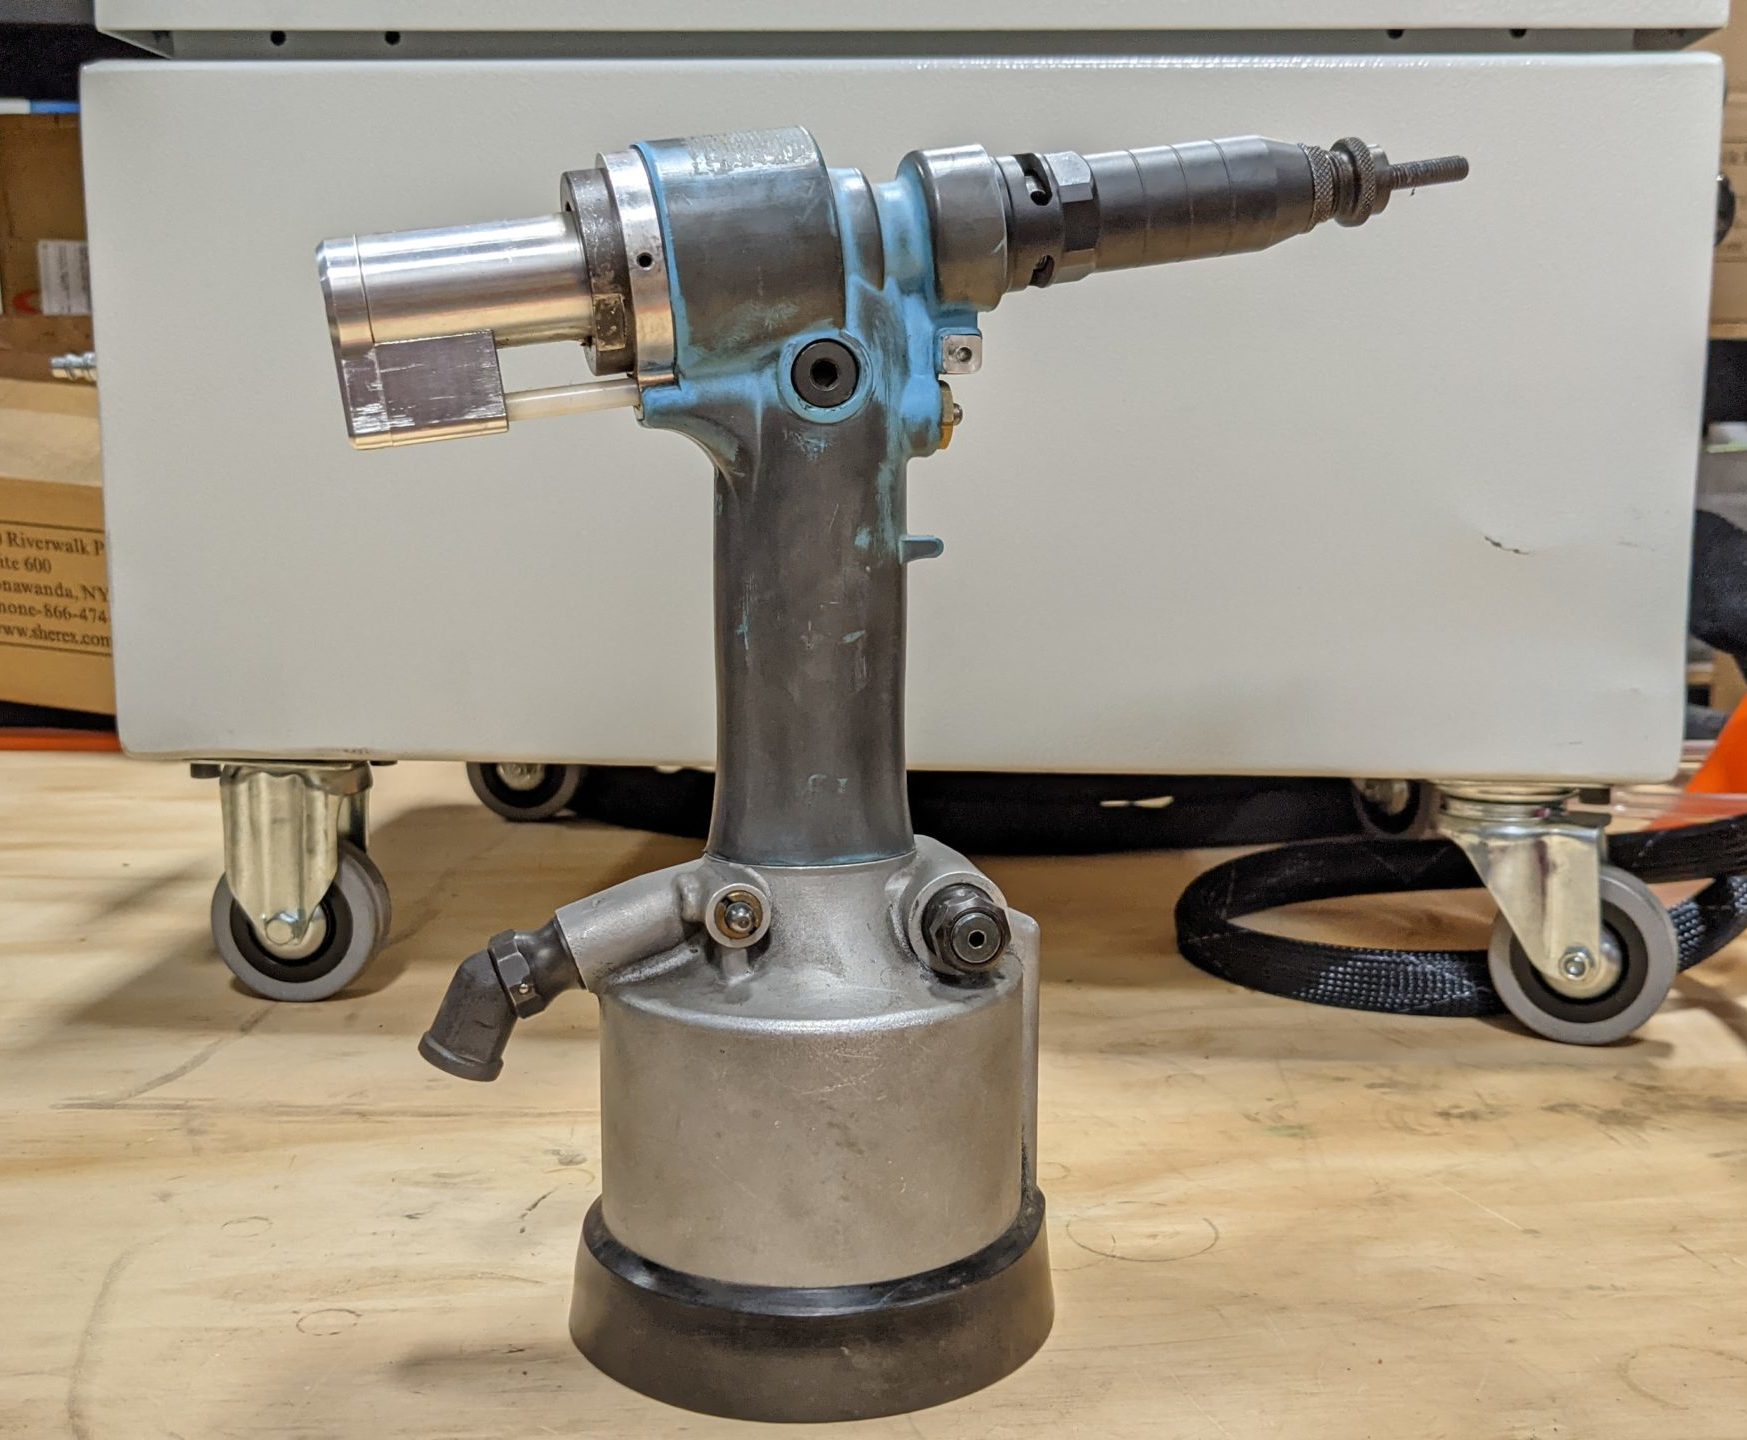
Typical rivet nut installation tool
Pull-to-pressure is a bit of a misnomer as it is actually pull-to-force. The installation tool is set to pull to a specific force– still with the hydro-pneumatic function. Pulling to a force accounts for variations in base material thickness, as the tool will “self-adjust” to stroke differences and will continue to pull until the set force is achieved. This is, by far, the best practice method for installing rivet nuts. Setting to a proper force will ensure an appropriate installation, regardless of material thickness variations, so long as the variations are within the prescribed grip range of the rivet nut.
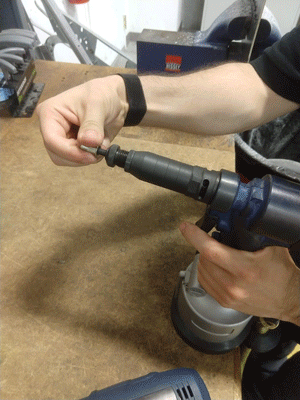
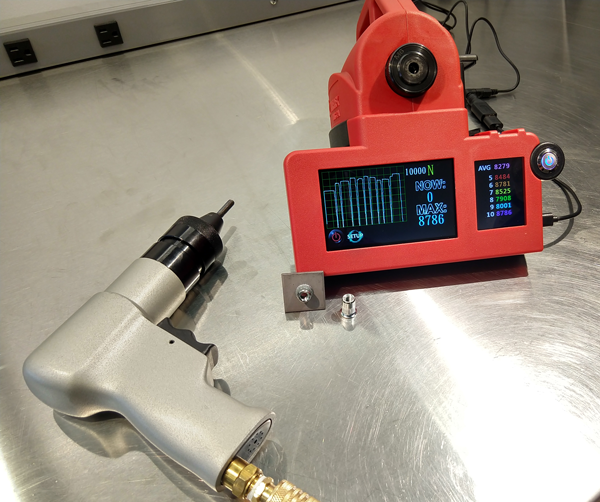
But even if you have the correct pull-to-pressure tool, how do you know if it is set-up properly? Earlier in this article, it was mentioned that every rivet nut has a predetermined installation force range, determined by style, size, and design. When given these parameters by the rivet nut manufacturer, there is no inherent method on the base tool setup to verify exactly what force to which the tool is set. Fortunately, there are devices available that can be used to validate the installation tool setup. Sherex’s Hand Tool Calibration Unit utilizes a direct force load cell to measure the pull force setting, up to 50 kN. The installation tool can be quickly and easily threaded into the unit, actuated, and allow the operator to determine and subsequently adjust to the appropriate force setting.
Hand Tool Calibration Unit
However, pull-force setting is only one part of the equation. Proper pull force will ensure that the rivet nut will set adequately under appropriate operator set up and base material conditions. Of course, we all know that operators are human – they will not always set the rivet nut perfectly flush to the base material; they may not hold the trigger of the tool long enough for a proper cycle; or may place the nut in the wrong location. The base material may not be devoid of defects such as large burrs, or material thickness may not always be within specification. Simply having the tool set to the proper force will not prevent a non-conformance should any of these conditions exist. The only way to completely error-proof the entire installation process is to integrate full installation process monitoring or complete automation.
Rivet nut installation process monitoring incorporates sensors to the installation tooling that measures both the pull force and pull distance of each individual rivet nut. This data is plotted on a force versus distance curve and GO/NO GO evaluation is performed on that curve. Close collaboration with the customer, as well as predetermined performance specifications of the rivet nut, will determine the acceptance parameters, as well as the results of the evaluation. Many times, process monitoring systems will be incorporated into control systems at the end-user, whereas in the event of a bad set, the system will disable the tool or assembly station, preventing poor quality from advancing downstream. Process monitoring will ensure that all set rivet nuts will be validated at end-of-line.
Process monitoring installation tool with full force vs. distance plotting/evaluation
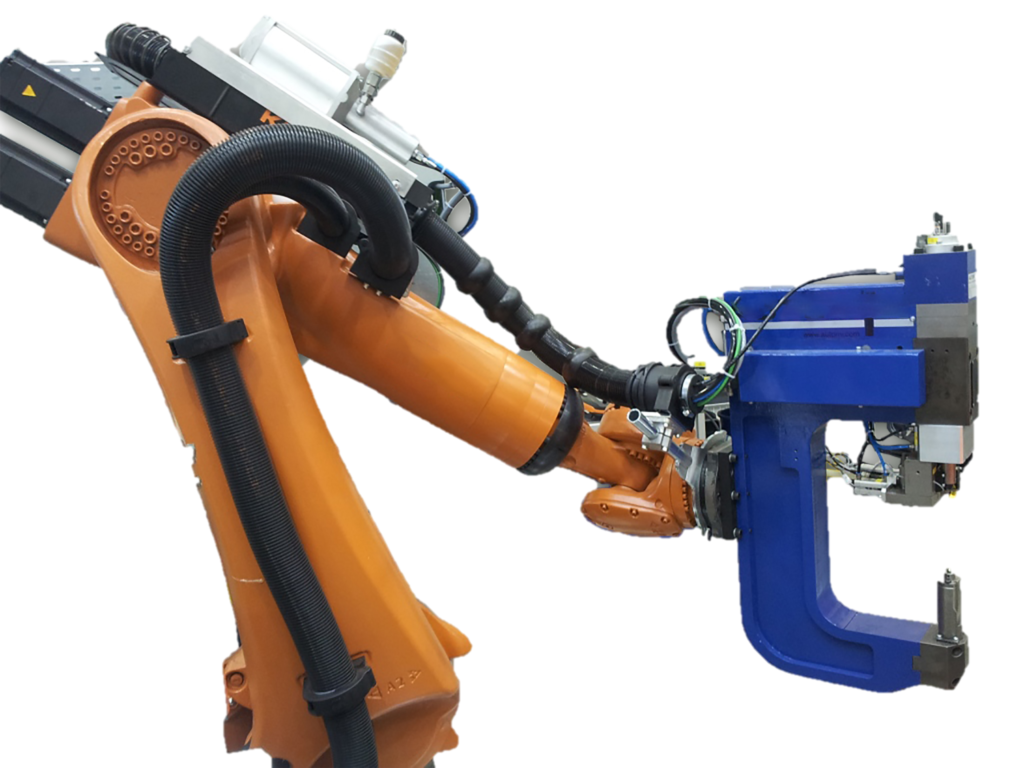
Fully automated systems incorporate all the above concepts, but go further by taking the “human” element out of the process. Full rivet nut automation can be justified by quantities around 250,000 installations per year and above, but can also be justified in lower volumes when considering the need for very high levels of quality. Various forms of feeder systems and end-of arm installation heads, where the rivet nut is presented to a stationary part, or stationary head systems where the part is presented to the installation head can be provided, based on need or want. Fully automated rivet nut fastener systems, such as those provided by Sherex Automation by MDS, can ensure 100% proper locational placement, full consistency for installation force monitoring, as well as full, closed-loop process control.
Fully automated installation head (end of arm), with rivet nut feeder
Sherex offers fastener installation systems to accommodate every solution. Engineers are available to evaluate every application to determine the best fit for the Lowest Total Installed Cost.
Posted by Pier Cipollone on | Comments Off on The Perfect Workstation for Installing Rivet Nuts
What do you need to be successful at installing rivet nuts? Depends who you ask.
For some, it’s just parts and a rivet nut tool. But it really should be more than that.
Let’s take a look at what every rivet nut installer should have at his or her rivet nut workstation:
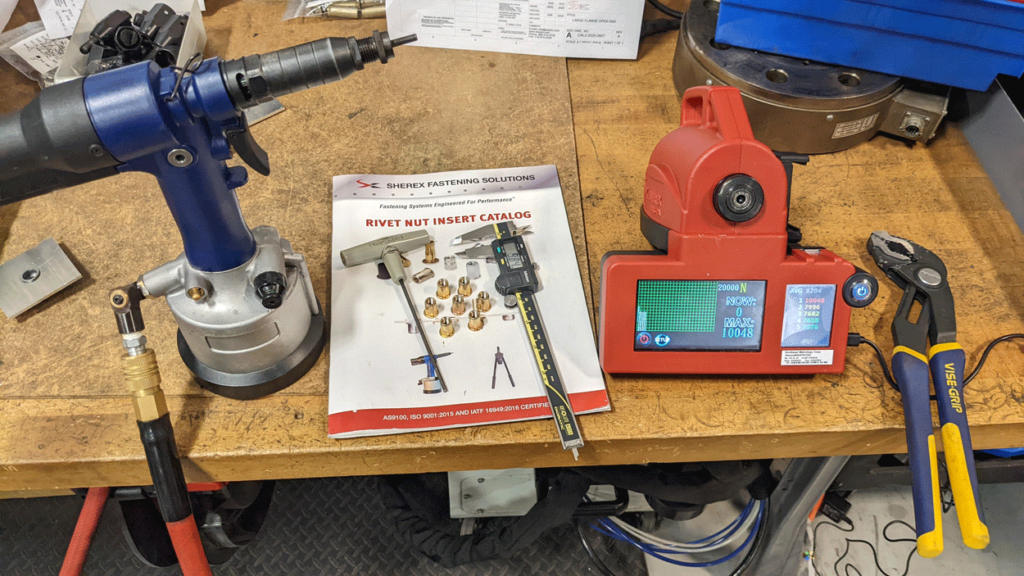
Hand Tool Calibration Unit Unless you’re installing parts with a process monitoring tool, you need a Hand Tool Calibration Unit. The Hand Tool Calibration Unit shows the pulling force of the rivet nut installation tool, so users know the exact installation force being used to install the part. A dip in pulling force may set the part improperly, leading to rework and time spent fixing parts the user already installed.
Calipers Every fastener installer needs calipers at their workstation. Calipers are used to measure the dimension and length of an object. This could be the measurement of the hole, or the installed length of the rivet nut. They help ensure the part was installed correctly too.
Rivet Nut Catalog The rivet nut catalog has loads of information the user may need during their installations. Everything from grip range, installation length, hole size, part number nomenclature and more. It’s a valuable reference to make sure you’re installing the correct part.
Hex Tool Hex tool is used to increase or decrease the pressure on your hydro-pneumatic rivet nut tool. By using the Hand Tool Calibration Unit to check the pressure, you’ll know whether to turn the pressure up or down on your rivet nut tool.
Vice Grips Vice Grips are used to install the headset on the Hand Tool Calibration Unit and change the headset on your tooling.
Rivet Nut Tooling It goes without saying, you need rivet nut tools to install rivet nuts. There are a variety of fastener installation systems you can use, but preferably it would be a hydro-pneumatic tool as it offers fast installation with the ability to spin the part onto the mandrel itself.
The last two items are pretty obvious, but the others are really necessary to ensure a perfect installations. The Cal Unit so you know the pulling force, the calipers to make sure measurements are to spec, Rivet Nut Catalog to see specs of the part you’re installing, hex tool to change the pressure of the tool, and vice grips to change the mandrel of the Cal Unit. Oh, and you know, rivet nuts and rivet nut tool.
All this will make for some successful installations!
Posted by Pier Cipollone on | Comments Off on When Fastening Automation Makes Sense
There are variety of ways to install fasteners like rivet nuts or clinch nuts into workpieces. Hand tools — manual, hydro-pneumatic, or pneumatic, are popular options and are used in low and high volume assemblies.
Automation is another option. Fastener automation systems usually consists of a robotic arm or robotic station where fasteners are automatically installed into the workpiece. In some cases, this removes the need for a human to be involved, letting the automation system handle the work itself. Sounds great, but let’s take a look at when using these systems make a lot of sense, and the advantages of having an automated system.
Large Quantity Installations
Automated fastening systems are typically used for high volume installations, on an assembly line for example. These systems install fasteners faster than manual assembly, and it might not take much human operation besides initial set up. Some automation systems even have a mobile arm that grabs the work piece and installs the rivet nut or clinch nut. Either way, the cycle time from part installation to part installation on an automated fastening system are faster than installations with spin-pull hand tools, which are also used in high volume installations, by at least a 2 to 3 seconds. Multiply that over the course of an hour and your throughput could increase considerably.
Automation Fastener System with Mobile Arm
24/7 Installations
US manufacturers are BUSY. Demand for everything from cars, to exercise machines, to refrigerators, to furniture is through the roof. Increase in demand means time is money. The quicker things leave the plant, the more money to be made. This is where automation comes in. Automated fastening systems can run 24/7 without the need for humans. Once set up properly, and enough fasteners and materials are in place, the fastening systems can be self-sufficient. As long as there are parts and a conveyor system, the system could run non-stop.
For as intelligent as mankind is, we’re also clumsy. Robots, on the other hand, are precise. Automated fastening systems install parts to the exact force and at the exact location every time. Some systems also come with process monitoring, which can tell if the part has been installed properly based on a variety of factors, including pulling force of the system and material thickness of the application. If an installation is improper, a stop tool function is an option to ensure no more unsatisfactory installations take place which would avoid rework and material waste. This also prevents potentially dozens or hundreds of unsatisfactory installations from taking place.
ROI
This is the most important factor in any decision about automation. What’s the cost? And will I make my money back? It’s no secret that automation is more expensive than a traditional spin-pull, line ready tool like the FLEX-5. But factor in increased quality of installations, increased throughput, and ability for the fastening system to be more efficient and able to run without operators, the return on investment could be substantial over time if you factor in labor costs. Maintenance on automation systems will occur over time, and it might be recommended to have yearly scheduled maintenance on the systems to ensure efficient performance, but during that time there could potentially be no rework, no waste, and outstanding quality at no operator expense.
Sherex has a wide range of fastening installation systems that can satisfy a wide range of high volume rivet nut and clinch nut installations. The Sherex Engineering Team can help determine the best tooling option at your facility, including if automation is an viable option. Contact us to learn more about fastener automation and how it could be a solution at your location.
Posted by Pier Cipollone on | Comments Off on Why Process Monitoring Is More Important Than Ever
Deciding on what fastener to use on an assembly takes a lot of time and effort.
First you have to analyze what fastener will provide the proper strength and grip to secure joints, and then combine that with the right tooling to make installations efficient. These processes take a lot of time and effort from engineering to determine the best fit for your product, and that doesn’t even factor in the investment in purchasing fasteners, tooling and calibration units.
So when it comes to the actual installation of the fastener on to the assembly, and after putting in all the work to find the correct product and tooling, the installation has to be perfect. Unfortunately, this isn’t always the case.
Sherex Process Monitoring System analyzes fastener installations
When installing fasteners at a high volume, anything from human error, tooling issues, improper hole sizes or material thickness variations may occur from time to time. These improper installations could lead to bigger problems down the road. Not only could it lead to safety concerns, but could also lead to material waste, re-work, and other expensive delays that cost manufactures valuable time and money.
This is why Process Monitoring is so important. Having a Process Monitoring Installation System in place lets the operator/installer know if their fastener installation is satisfactory or not. With a system that’s configured to the specific part that’s being installed, along with the thickness of the base material it’s being installed into, these systems determine the results of an installation instantaneously. Add in the historical analysis of the installations that are occurring, and installations are driven by quantifiable data, not just by user feel. These systems even support a “stop tool” function to allow operators to analyze or reinstall the part if installation wasn’t satisfactory.
Process Monitoring Systems are required in a number of industries, including automotive manufacturing, and they’re becoming more popular. The ROI on a Process Monitoring System compared to the time and waste of incorrectly installed items, or even potential litigation from an installation that wasn’t perfect, could pay for itself relatively quickly. These systems can be used in low or high volume installations, including on an assembly line.
With installations being so critical to the assembly of any product, the risk of not knowing if an installation is proper is not worth saving a few bucks, especially if a worse case scenario happens, whatever that may be. Process Monitoring Systems combines quality control and efficiency so installers can feel good when the assemblies keep moving down the line.
Posted by Pier Cipollone on | Comments Off on FLEX-5 Durability and Maintenance Tips!
It’s always a cool feeling walking around an assembly line or installation station and seeing your parts or tools being put to good use.
But it’s even sweeter when you see an old tool of yours still being used by the assemblers and it’s still humming. On a recent trip to a construction, military and heavy duty truck fabricator to check out the assembly line, we came across one of our first, possibly THE first, FLEX-5 rivet nut tool we’ve ever sold – and it’s still in use!
Check out this photo of this first generation FLEX-5 that’s used to install Sherex Rivet Nut Studs. Based on the serial number, this was probably delivered in the second half of 2009. Almost 12 years old and still installing rivet nut studs today. COOL!
Possibly the first FLEX-5 delivered to a customer in late 2009
Now, this particular user does have a new FLEX-5 that they are using on the line, but “Ol’ Reliable” is still humming too.
When these images were shared with our Engineering Technician, Mike, who services a lot of our tools, he was quite impressed.
“These older FLEX-5’s hold up really well with just some basic care.” Mike said. “But even knowing that, it’s cool seeing one still out in the wild.”
Mike has FLEX-5 serial No. 1 on his desk, which is a keepsake at Sherex Headquarters for now.
FLEX-5 Serial No. 1, from probably late 2008 – early 2009
Easy FLEX-5 Maintenance Tips!
Basic care of hydro-pnuematic rivet nut tools is really important to their durability. Here are a few easy steps to take to ensure a long-lasting tool like the ones above.
If the air supply is not equipped with lubricator before use, squeeze a few drops of light lubricating oil on the tool air inlet.
High friction locations, such as spindle housing, should be re-greased with a high speed, high temperature grease.
Every 500,000 cycles the tool should be completely checked and parts that are worn or damaged should be replaced.
O-rings should be replaced and lubricated with Molykote® 55M grease or equivalent before assembly.
Please contact Sherex to order replacement o-rings and lubricant. Remember, if having any issues with your tool, contact Sherex.
Posted by Pier Cipollone on | Comments Off on FLEX-5: Pull to Pressure or Pull to Stroke?
When installing rivet nuts using a Sherex FLEX-5 hydro-pneumatic tool, you have a decision to make on what kind of tool you want. Do you want a tool that offers a pull to stroke? Or do you want a tool that offers pull to pressure when installing rivet nuts.
Both Pull-to-Pressure and Pull-to-Stroke tools can install just about any style of rivet nut from sizes #4-40 to 3/18-16 (M3 – M10), and can be used for both low volume and high volume installations, including on an assembly line.
FLEX-5P – Pull to Pressure
The FLEX-5P Pull to Pressure tool is a great, all around tool that can be used to install a variety of different products into different thickness material. With a single stage trigger the tool is easy to use and if you know the proper pressure of the part being installed in your specific material, then you are all set. Use the Sherex Hand Tool Calibration Unit to find out the exact pulling force of your tool and begin your installations.
The FLEX-5P has a pulling force upwards of 5,000 lbs.
FLEX-5S Pull to Stroke
The Sherex FLEX-5S, Pull to Stroke rivet nut tool gives a precise install to an exact material thickness. It can install rivet nuts at a set length and is better suited when the installation has limited backside clearance. The tool offers 7mm of available stroke.
So if you’re installing a very high volume of rivet nuts into the same material thickness, the perfection of the pull-to-stroke tool may be ideal over a pull-to-pressure tool.
Pull to stroke tool is also best utilized when installing into soft or brittle materials.
Conclusion
In terms of performance, both tools are extremely durable and can install the same rivet nuts. But the biggest question to answer when deciding between the FLEX-5P or FLEX-5S, do you need the flexibility in installing rivet nuts by pressure, or will this tool be used for a specific material thickness and installed length for a project’s needs?
If you need help on deciding on what tool to purchase, contact us and a member of our engineering team will point you in the right direction.
Posted by Pier Cipollone on | Comments Off on Hand Tool Calibration Unit Crucial for Quality, and Root Cause Analysis
By Frank Genovese, Sherex Applications Engineer
A lot of work goes into assembly design, and it’s important to ensure your product goes out of the facility with everything manufactured to specification. While sampling can assist with quality assurance, it’s always a good idea to have an in-process check to quickly determine whether or not your assembly is being put together correctly.
When it comes to rivet nuts, quality of installation can vary based on a wide array of factors. These factors may include, but are not limited to: air pressure being supplied to your tool, the setting of the tool’s load adjustment mechanism (when applicable), integrity of the tool itself, installation pane thickness, operator use of the tool, or part quality. With so many possible root causes it’s nice to have a way to narrow things down.
The new Sherex Hand Tool Calibration Unit is an asset that allows operators to insert a spin-spin or spin-pull tool, test an install, and receive the peak load put out by the tool during that install. This essentially takes the guess work out of setting your installations and allows you to calibrate the tool accordingly. The unit is able to capture and store historical data, including moving averages to allow operators to note any possible changes in installation load over time, and then immediately make adjustments to the tool to correct its course whenever necessary. This will help with planning tool maintenance and to become more comfortable with how the tool operates.
More Than Just Calibration
This also allows operators or engineers to better determine if there is a problem during installation. Was it air pressure, gun not setting correctly, quality of rivet nuts, material thickness issue? The Hand Tool Calibration Unit can help determine or eliminate root causes during analysis if a problem exists.
Another benefit, with the ability to easily perform in-process quality checks on your tool, you can further design your internal fabrication and changeover processes to ensure you strike the perfect balance between quality and speed, especially when installing more than one type of rivet nut.
To assist with your in-house applications, the Sherex Engineering Department has put together a whole host of reference material to provide recommended installation loads for a host of different product lines, thread sizes, and grip ranges. This material should give significant guidance on proper use of our tools and parts.
The calibration unit is a tool for quality. It lets operators know how their tool is operating, takes the guess work out of setting installations, and helps in determining the root causes of any rivet nut installation issues.
Posted by Pier Cipollone on | Comments Off on Spin-Spin vs. Spin-Pull Rivet Nut Tooling
When it comes to rivet nut tooling, there are a variety of different options. While small-volume applications may often result in a manual hand tool being the best choice, larger-volume installation projects may require more robust tooling. Two of the most popular non-manual options are air-powered tools that install rivet nuts through either a spin-spin and spin-pull action.
Let’s go through the differences between spin-spin and spin-pull rivet nut installation tools.
Spin-Spin Rivet Nut Tool
A spin-spin rivet nut tool is an air-powered tool that, once a rivet nut is secured onto it, utilizes torque to spin its mandrel inward in order to collapse the rivet nut. The torque, driven by an air motor, ramps up continuously until the rivet nut fully collapses. After installation, the tool’s reverse trigger must be pressed to separate the tool from the now-installed rivet nut. In order to both maintain tool integrity as well as ensure proper installations, it is recommended that spin-spin mandrels be lubricated with wax.
The benefit of using spin-spin tools is that they are less expensive than spin-pull and can often be more lightweight, but its capabilities aren’t as complete as the spin-pull tool.
The installation base material can vary in thickness, but it is recommended that the rivet nuts being installed are thin-walled steel, aluminum or brass. Also, depending on what kind of spin-spin tool you purchase, it may often be limited in the thread sizes it can install. For instance, Sherex’s SSG-802 spin-spin tool is capable of installing parts with #10, ¼”, M5, and M6-diameter threads, and the SSG-803 is capable of installing 5/16”, 3/8”, M8, and M10-diameter threads. A hydro-pneumatic spin-pull tool is capable of installing all sizes between M3 to M10.
For a job that is consistently is going to use one part and one size, a spin-spin rivet nut tool would be a solid recommendation for the price.
Spin-Pull Rivet Nut Tool
A spin-pull rivet nut tool installs rivet nuts by pulling back its mandrel, rather than spinning it back. The rivet nut spins itself on to the mandrel, and then the mandrel pulls the threads of the rivet nut on to the base material, installing the rivet nut. The tool then spins the opposite way to release installed rivet nut. This tool is also referred to spin-pull-spin as explained in the two sentences before.
Sherex’s Flex-5 line of spin-pull tools is hydro-pneumatic, as the tool uses air and oil to install the part. A spin-pull tool can install everything that a spin-spin tool can, as well as more heavy-duty rivet nuts like full-body hex-style rivet nuts, European body styles, and stainless steel parts.
Another benefit of using a spin-pull tool is that it can install a wide range of thread sizes – from M3 through M10 for metric sizes, and from #4-40 to 3/8”-24 for inch sizes. You would need three different spin-spin tools to install that thread range!
For a job that is consistently is going to use one (compatible) part at one size, a spin-spin rivet nut tool would be a solid recommendation for the price. A spin-spin tool may be heavier and more expensive, but it is a far more versatile tool that can install more styles and more sizes of rivet nuts. All that is needed – for either tool – is the appropriate headset for the thread size you are trying to install.
Need help deciding between a spin-spin tool and a spin-pull tool for your next project? Contact us!
We use cookies to ensure that we give you the best experience on our website. If you continue to use this site we will assume that you are happy with it.


 The new